


How to use Http Server
What is a web server for?
The built into the MST web server module is needed to execute web requests through your browser or Javascript code to obtain any kind of information or perform any task on the server side.
For example, you can create a small web panel in which you will manage the sending of chat messages to all users.
Creating a Notification Controller
Let's create a notification controller that will receive messages from web requests. Let's call our controller class as NotificationHttpController, it will be a derived class from HttpController. Let's also add an initialization method to it and connect the notification module to it through the inspector. Look at code below.
public class NotificationHttpController : HttpController
{
#region INSPECTOR
[Header("Components"), SerializeField]
private NotificationModule notificationModule;
#endregion
public override void Initialize(HttpServerModule httpServer)
{
base.Initialize(httpServer);
}
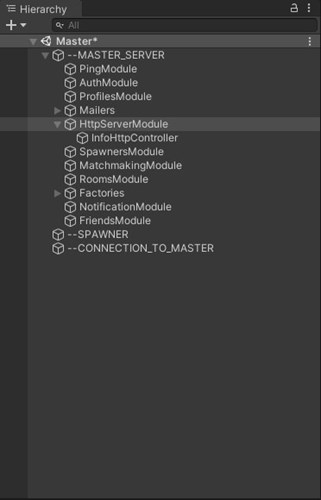
}After that, add the HttpServerModule to the Master server scene.
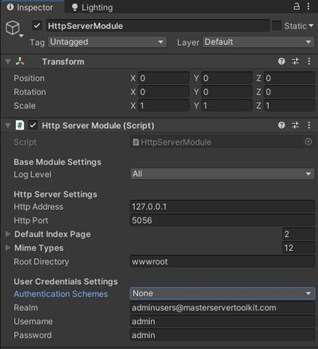
As you can see in inspector of HttpServerModule it has Authentication scheme. You can use it to block unauthorized access to your web module. If you use , for example, digest scheme and try to get access to your web page you will see input your credentials prompt window. Use username and password specified in inspector.
Now add newly created controller to scene as child of our web server. Then add NotificationHttpController component to it. Assign NotificationModule to notification module field in inspector. Thus, at startup, the web server module initializes all child controllers.
Next, we need to register our controller to listen to web requests. Let's do this using the method of registering controllers in the web server. See the code below.
public override void Initialize(HttpServerModule httpServer)
{
    base.Initialize(httpServer);

    // Create new post controller
    httpServer.RegisterHttpRequestHandler("notify", HttpMethod.POST, OnNotifyHttpRequestHandler);
}
First parameter is a path in our request. For example http://host/notify. The second parameter is a web request method, we can use POST, GET etc. The third parameter is our request handler. See the code of that handler below. We also added response to our request.
private void OnNotifyHttpRequestHandler((HttpListenerRequest request, HttpListenerResponse response)
{
byte[] contents = Encoding.UTF8.GetBytes("Hello from NotificationHttpController");
response.ContentType = "text/html";
response.ContentEncoding = Encoding.UTF8;
response.ContentLength64 = contents.LongLength;
response.Close(contents, true);
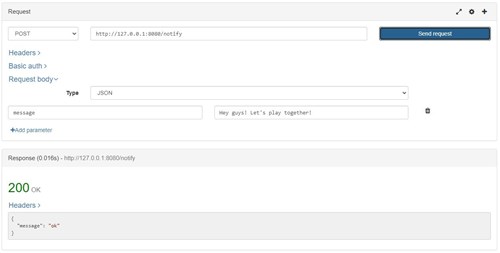
}Now make a POST request with your web request maker, I use web browser extension
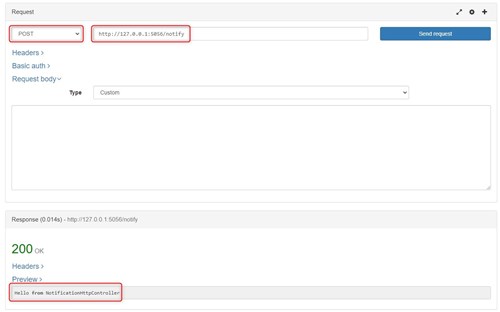
As you can see we made post request to http://127.0.0.1:5056/notify and got response.
Our goal was to write a web notification controller. The entire controller code is below.
using Newtonsoft.Json.Linq;
using System;
using System.Collections;
using System.Collections.Generic;
using System.IO;
using System.Text;
using UnityEngine;
using WebSocketSharp.Net;
using WebSocketSharp.Server;
namespace MasterServerToolkit.MasterServer
{
public class NotificationHttpController : HttpController
{
#region INSPECTOR
[Header("Components"), SerializeField]
private NotificationModule notificationModule;
#endregion
public override void Initialize(HttpServerModule httpServer)
{
base.Initialize(httpServer);
// Create new post controller
httpServer.RegisterHttpRequestHandler("notify", HttpMethod.POST, OnNotifyHttpRequestHandler);
}
private void OnNotifyHttpRequestHandler((HttpListenerRequest request, HttpListenerResponse response)
{
var jsonResponse = new JObject();
try
{
var jsonRequest = new JObject();
using (StreamReader stream = new StreamReader(request.InputStream))
{
jsonRequest = JObject.Parse(stream.ReadToEnd());
}
if (!jsonRequest.ContainsKey("message")) throw new Exception("[message] parameter is not defined");
if (!notificationModule) throw new Exception("[NotificationModule] not found");
// Read message
string message = jsonRequest.Value<string>("message");
// Send message to all recipients
notificationModule.NoticeToAll(message);
// Respond OK
jsonResponse.Add("message", "ok");
byte[] contents = Encoding.UTF8.GetBytes(jsonResponse.ToString());
response.ContentType = "application/json";
response.ContentEncoding = Encoding.UTF8;
response.ContentLength64 = contents.LongLength;
response.Close(contents, true);
}
catch (Exception e)
{
jsonResponse.Add("error", e.Message);
byte[] contents = Encoding.UTF8.GetBytes(jsonResponse.ToString());
response.ContentType = "application/json";
response.ContentEncoding = Encoding.UTF8;
response.ContentLength64 = contents.LongLength;
response.StatusCode = (int)HttpStatusCode.InternalServerError;
response.Close(contents, true);
}
}
}
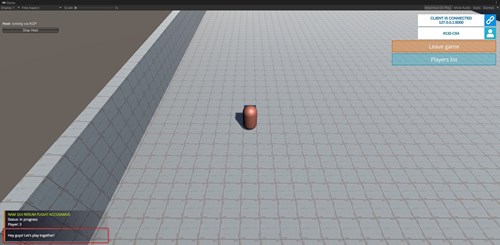
}If you run the example from the Bridges/Mirror/BasicRoomsAndLobbies folder, which already contains a ready-made notification controller, then run the request with the parameters specified in the screenshot, you will see your notifications appear in the lower left corner.