


List of Game Servers/Rooms
There are times when you don't need a system to run game servers/rooms. For example, in the game Counter Strike, players could run a server on their PC and it appeared in the global list of game servers. No "matchmaking" or "spawners". Just start game server and it is in list!
This framework allows you to achieve the same result. Let's find out how.
Let's say you created your mmo game using Fish-Net, Mirror Networking, Forge Remastered, or other multi-player game creation systems.
You already have multiplayer logic running and you want to run several game servers so that your players or testers can play your game. You can of course send out the IP addresses and ports of your game servers to everyone who will play. Or you can use the systems of this framework. This can be done in a simple way.
Creating Master Server Scene
First, you need to create an empty scene and create an empty object in it. I called it --MASTER_SERVER, but you can call it whatever you want. Add the MasterServerBehavior component to it. You can leave all the component's default settings.
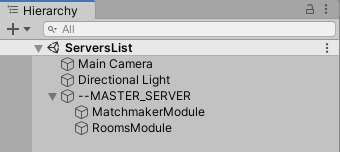
Next, you need to add modules. To do this, create two empty objects as children of our --MASTERSERVER. Name one MatchmakerModule and the second RoomsModule. Add the MatchmakerModule and RoomsModule components to both objects, respectively. You can leave the settings as default.
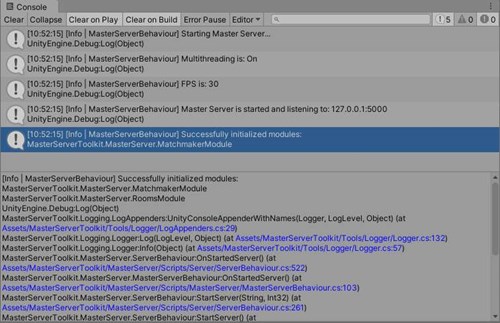
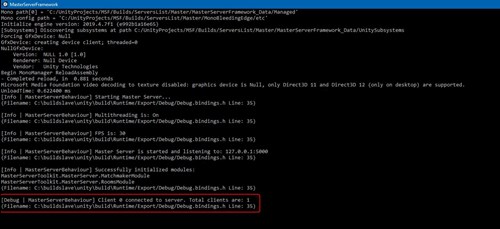
Launch your scene in game mode. The master server must start successfully and connect all the available modules, in our case it is MatchmakerModule and RoomsModule. In the output console, if you did everything correctly, you should see the following:
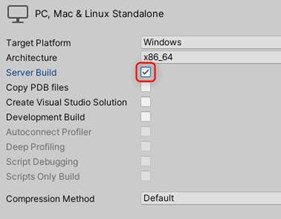
After successful verification, you can build your master server with a single scene where you created all these objects and components. After the build, create a shortcut to your master server and input all the command-line arguments you need. The argument "-mstStartMaster", which runs the master server when you start it is mandatory. How to set command-line arguments is described in detail here. The build must be performed with the Server Build check box selected. This is necessary in order for our master server to start in the console window. You can find out more here.
That's it, the master server is ready to register your game servers! Now we move on to programming.
You need to write a small code to register your game server in the global list, but first let's create a helper component that will help your game server connect to the master server to interact with it.
Setting Up Game Server
Open the launch scene of your game server and follow these steps:
Create an empty object in the scene and name it, for example, --MASTER_CONNECTION_HELPER. Attach the ClientToMasterConnector component to this object. In its settings, specify the IP address and port for connecting to the master server. In our case, we test our logic locally, but if you are already planning to run your master server on a virtual dedicated server (VDS), specify the appropriate connection parameters in the serverIp field and in the serverPort field. Also check the connectOnStart checkbox so that our connection is made immediately after starting. You can also specify this data using command-line arguments.
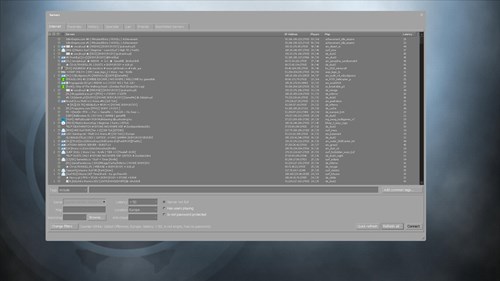
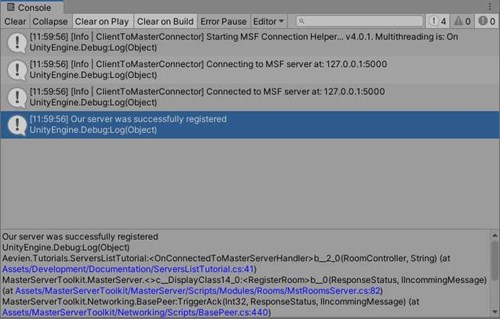
Let's test our connection of the game server with the master. Launch our master server that we built earlier. Then run your game server in the editor. In the screenshot below, we can see the connected client.
The connected client is our game server. Now let's write the registration code for our game server in the list. You can complete the process of registering the game server in the list immediately after you have started it and it will successfully connect to the master server. The example below shows how to do this.
using MasterServerToolkit.MasterServer;
using MasterServerToolkit.Networking;
using System.Collections;
using System.Collections.Generic;
using UnityEngine;

namespace MasterServerToolkit.Tutorials
{
    public class ServersListTutorial : MonoBehaviour
    {
        private RoomController roomController;

        // Start is called before the first frame update
        void Start()
        {
            Mst.Client.Connection.AddConnectionOpenListener(OnConnectedToMasterServerHandler, true);
            Mst.Client.Connection.AddConnectionCloseListener(OnDisconnectedFromMasterServerHandler, false);
        }

        private void OnConnectedToMasterServerHandler(IClientSocket client)
        {
            RoomOptions options = new RoomOptions
            {
                IsPublic = true,
                // Your Game Server Name
                Name = "My Game With Friends",
                // If you want your server to be passworded
                Password = "",
                // Machine IP the server is running on
                RoomIp = "127.0.0.1",
                // Port of the game server
                RoomPort = 7777,
                // The max number of connections
                MaxConnections = 10
            };

            Mst.Server.Rooms.RegisterRoom(options, (controller, error) =>
            {
                if (!string.IsNullOrEmpty(error))
                {
                    Debug.LogError(error);
                    return;
                }

                roomController = controller;

                Debug.Log("Our server was successfully registered");
            });
        }

        private void OnDisconnectedFromMasterServerHandler(IClientSocket client)
        {
            Mst.Server.Rooms.DestroyRoom(roomController.RoomId, (isSuccess, error) =>
            {
                // Your code here...
            });
        }
    }
}- In the Start() method, we register listening for connection events to the master server.
- In the OnConnectedToMasterServerHandler method, we create options for our game server and pass them to the game server registration request.
- In response to our request, we get the RoomController, which stores information about the registered server, as well as information about errors if something went wrong.
- In the OnDisconnectedFromMasterServerHandler method, we execute our logic, which must be worked out if the connection to the master server is lost.
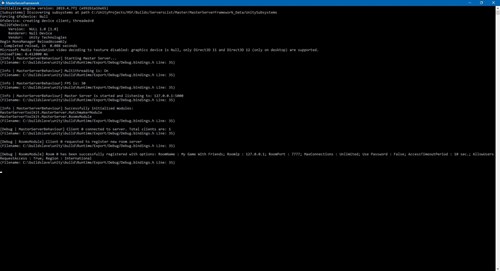
If we run our game server with this script, we will see the following:
The following information will be displayed in the master server console.
Moving on to the client side
So, the master server is running and accepts game servers for registration. The game server is successfully registered. Next, we need to get a list of game servers on the client side when the player opens the server list selection window. When you open this window or click the update server list button we can send a request to the master server as follows:
Mst.Client.Matchmaker.FindGames((games) =>
{
    canvasGroup.interactable = true;

    if (games.Count == 0)
    {
        statusInfoText.text = "No games found! Try to create your own.";
        return;
    }

    statusInfoText.gameObject.SetActive(false);
    DrawGamesList(games);
});
The above code is taken from the GamesListView class. This is a component for displaying the list of game servers. Pull this component to the scene from the Master Server Toolkit > Bridges > Shared > Prefabs > UI folder. Uncheck the HideOnStart checkbox in the GamesListView component inspector. Launch game mode and click Update List button in the window. In the list of servers, you will see your server with the parameters that you set when registering the game server.

When you click on a list item, runs the following command:
MatchmakingBehaviour.Instance.StartMatch(gameInfo);This command should run your logic for connecting to the game server. You can easily override this method.
So you learned how to register your game server in the list. But what if you want to create a so-called "matchmaking"? We will talk about this in next guide.